Contact Us So We Can tailor Your Summer Trip with You!
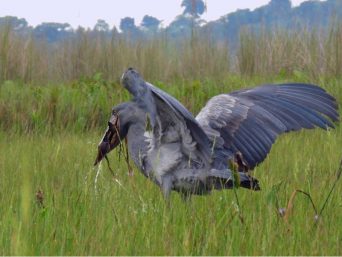
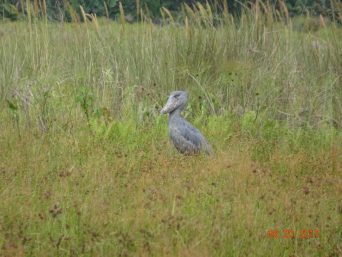
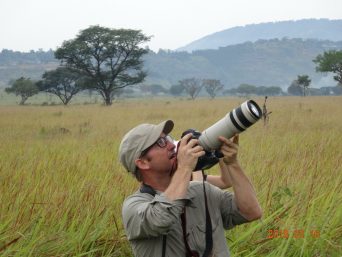
Winston Churchill once called Uganda the Pearl of Africa. Indeed, this is true as Uganda is one of the most beautiful and diverse countries in Africa. It is a country dominated by great lakes, the birth of the Nile River, vast forests and savannas, and the mist-shrouded peaks of the Ruwenzori – the famed “Mountains of the Moon”. For the wildlife enthusiast, Uganda is uniquely positioned between the faunal groups of East Africa and West Africa. It also sits on the boundary between dry Northern Africa and Sub-Saharan Africa. This geographical position produces a mixture of species from different regions and allows such a small country to have incredible biodiversity.
Students/scientists/NGOs are welcome
This trip has been designed specifically for students and scientists who are interested in bird banding in Uganda. Students will also be immersed in Ugandan culture, and learn about the importance of ecotourism in the country.
Bird banding field trips are tailor-made there-by giving us the intended length of fieldwork trip and places of interest to enable us to plan well for the team/s
If you are interested, please inquire by emailing us at: info@ensinature.com
Bird banding or ringing
Bird banding is the application of a band or ring to a wild bird that allows for its identification. Banding is used as a research tool to determine the basic life history of birds and the tracking of their movements. Researchers’ recapture of banded birds can provide information on longevity, mortality, aging, and sex characteristics. Importantly, information can also be discovered about local and regional movements, global migration, population dynamics, territoriality, and behavioral ecology.
Bird banding or ringing is important for continuing research on bird nesting and migration patterns, and for educating birders about aging birds from the condition and molting stage of their feathers as indicated above.
Many hatch-year birds (those newly hatched) with new feathers are identified by the crisp edges and pointed tips. Older feathers on adult birds will look worn and the tips can be frayed or broken. Using the quality of a bird’s feathers to determine a bird’s age can be an excellent aid in identifying birds in the field.
Each bird is logged noting its identification to species or subspecies, sex, age, and then weighed. Bird banders learn how to safely hold the bird around its neck between the index and middle fingers and cupped in the palm. The bird can easily be turned over for inspection of its fat reserves when the bander softly blows the feathers apart on the belly. The quality of the fat reserves is also logged. Finally, a metal band etched with serial and telephone numbers is attached to the bird’s leg, so that the station can be notified if anyone finds the bird or if it is recaptured in the future.
How do you catch birds?
We catch birds in a fine nylon mesh net called a mist net, which is strung up between two poles. The fine mesh is not immediately visible against the background vegetation, so the majority of birds fly into the net and are caught.
The essential equipment required to capture birds (as per my kit!), includes:
- 15 pairs of aluminum or wooden poles (each pole in three sections), in a custom-made canvas bag.
- 20 mist nets, that measure around 10 feet high and of various lengths between 20 and 60 feet.
- Enough guy ropes (made out of Venetian blind cord) and tent pegs for the number of nets, plus a mallet, in another old backpack.
- 100-200 lightweight, white cloth bags with drawstrings, for holding birds
- Seam ripper (stitch picker), for cutting net strands should that be necessary.
The 40-foot-long mist net pictured below is stuffed into a bag measuring 15cm by 25cm. The ten-foot-high net is divided into four panels or shelves. The top shelf string is white, and the other four black shelf strings tie onto the white string in order. This method makes it so easy to set up a net very quickly, no tangles, no mess!
The essential equipment for operating a bird banding station:
- Many hundreds of bird bands, of multiple sizes, each of which is uniquely numbered.
- Color bands, of multiple colors and sizes.
- Pliers for applying bands.
- Pliers and some other bits and pieces for removing bands.
- Spring balances for measuring weight.
- Calipers and metal rules for measuring body parts.
- Hand lens (with integrated LED).
- Datasheets and writing tools.
- Manuals (e.g. bird aging and sexing guide).
Managing a banding crew
The key objective for a banding field trip is to catch as many birds as we can, given the human resources available, while paying particular regard to the target species for color banding that can be monitored.
The number one variable that determines what you can do is the number of people available. In particular, the number of fully trained/qualified/licensed bird banders is key, as they are the ones that do the bird extraction and processing.
Additional people such as trainees, volunteers, students, and other visitors can help in many ways, such as scribing data and assisting on net rounds like adjusting the nets, distributing empty bird bags to extractors, carrying bagged birds, acting as a runner back to the banding station.
Managing volunteers and students on such field trips is very much like managing people in a workplace. The focus must always be on the health, safety, and well-being of the people volunteering their time.
Further, students and volunteers are monitored for fatigue, and, as expected, no one wants to be doing the same task all day. So we make sure that people are rotated for different tasks, to avoid that feeling of being stuck doing the one activity. Anyone person in any given hour might do a net round, sit and process five to ten birds, scribe for 20 minutes, and make a cup of tea!
While the priority is to catch and band as many birds as possible using qualified people, it is also important to ensure that trainees get enough birds to work on under supervision, and that includes extracting and processing. Once the humans are taken care of, the next most important thing is the well-being of the birds.
At the end of the field trip, I want students, volunteers, and others to leave satisfied, that they got what they wanted out of the trip and that they had a good time!
Some researchers working with wild animals consider there to be an acceptable loss rate of study animals, be it through predation in a net or something related. In my view, no loss is acceptable, but I do understand that losses occur occasionally. Losing less than five individuals out of a couple of thousand birds might be considered acceptable, but if one of those birds is a known individual with a couple of years of breeding history that particular loss can be hard to take. The bottom line is we mitigate risks to avoid loss.
Net set up
Setting up mist nets can be a time-consuming exercise. In an ideal situation, a crew would set up at a banding site in the early afternoon, operate those nets that evening and the following morning, then move the nets to new sites in the early afternoon. Of course, nets can stay in one spot for two mornings in a row, but we’ve found that on the second day the capture rate is lower, the birds just get used to the nets (and the people).
An experienced crew of three can set up a mist net in just a few minutes. Just two people take a little longer and require a good routine. Setting up by yourself is possible, but difficult and time-consuming. A crew of four is no more efficient than a group of three. Taking down a net is much quicker and can be easily done by one person.
Capturing the birds
Ok, the nets are open, the crew is allocated tasks and the staggered breakfast consumption is underway. Time for a team to check the nets. Just how does that happen? Here is a brief rundown.
- On approaching a net site, silence is key to not disrupting birds in the area.
- Blend in, by wearing clothing that matches the habitat.
- Work quickly, without rushing, so you are at that net for as little time as possible.
- Have bird bags for each bird out of the carry bag and ready to be used.
- Start extracting birds from the bottom shelf first, they may be hanging to the ground and be badly tangled with forest litter, vegetation, or even subject to ant attack.
- Extract other vulnerable birds, such as those hanging in direct sunlight.
- For each bird, assess the way it went into the net, as it’s only going to come back out that way.
- Bag the bird, pull the drawstring tight, and tie a single knot around the neck of the bag so the bird can’t muscle out through any small gap.
- Bagged birds hang in a nearby tree or shrub in the shade, or are placed in a net pocket if that doesn’t interfere with other extractions; the golden rule is a bird in a bag never goes on the ground.
- Reset the net so it is ready to catch more birds.
- Collect the bagged birds and move to the next net.
Extracting very tangled birds takes patience and dexterity. A bird might hit a net, tumble down into the pocket created by the shelf string, flip itself around that string, and into the pocket a second time. A nightmare! However, even a messy bird can come out in a few seconds with practice.
It is vitally important to operate mist nets according to the weather conditions and the load captured.
Some species like warblers don’t cope well with cold hands and can get stressed if they are captured early on before they have had a chance to forage for food. It was not unusual to see a member of the crew return from a net round with a bundle of birds in bags, with one or two birds in bags down the front of their jacket for warmth. These were treated as priority birds, being processed and released quickly.
If quite a lot of birds are caught in the first net or two, they are bagged and sent back to the station immediately before completing the net round. If in my opinion there were too many birds to process before the next net round, consideration would be given to closing nets. Birds hanging in nets for too long means they could be subject to suboptimal conditions (e.g. predation by birds of prey and wild cats)
We try as much as possible to avoid interfering with breeding activity. For example, if we caught a breeding bird two or three times, we would close and move the net.
The banding station
The banding station was at a central point on the site and is the start and endpoint of a circuit of net sites. Ideally, the banding station would have:
- Shelter from sun and rain, for humans as well as birds waiting in bags or being processed.
- Enough space for a couple of tables and several chairs, for the people doing the bird processing.
- A rope strung between two-star pickets (metal fence posts) for birds in bags to be pegged on to.
- A bucket, for dirty bird bags that should not be used again.
- All necessary equipment and paperwork.
- Extra space for resting/relaxing, eating, and socializing.
Note that the socializing must be far enough away from the banding table so that it doesn’t interfere with the concentration of those people processing birds!
We would typically have two or three banders working with two scribes, with plenty of other people swapping in and out so everyone gets a break.
One of our banding stations in the field, pictured below, was a modest affair, yet comfortable enough, and largely sheltered from the elements thanks to a large tarp. Comfortable chairs are essential so that a person may sit for extended periods during busy processing times.
The color banding process
The main objective of color banding a bird is to be able to identify a specific individual in the field by sight, eliminating the need to recapture it to read its metal identification band. Many behavioral ecology studies rely on the marking of individuals in the field, so researchers can observe behavior (usually, who is doing what and to whom!)
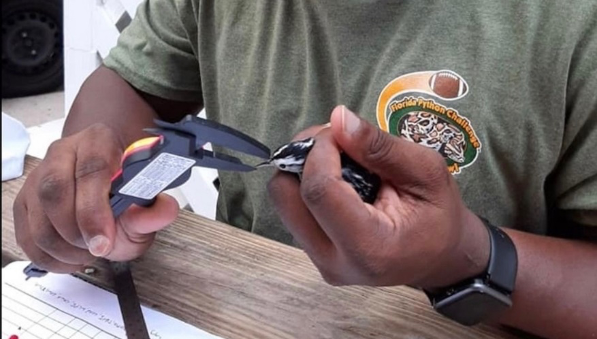
The photo below shows a researcher applying an orange color band to a species. The split ring plastic band is gently pushed up the small aluminum spoon so that it opens enough to be placed over the bird’s leg. The spoon is removed and the band goes back to looking like a solid band. A few squeezes with the fingers, and that band is not going to come off. Larger species, particularly those with strong bills, require the bander to glue the bands shut so they cannot be removed. Many of the color bands are made of PVC, so a plumber’s glue (that only sticks PVC to PVC) is used to seal the bands, ensuring that the bands cannot be removed by their new owner. Avoiding the use of other types of glue means we are not sticking bands to our fingers or indeed gluing the bands to the bird’s leg.
Below, is a small tackle box full of color bands, in four sizes that fit most small to medium birds. Plenty of orange bands as that was the master color for our site. There are three application spoons to the right. The guide to aging and sexing bush birds are underneath!
Another box of larger bands, and a collection of anodized aluminum bands (a couple of species have had issues with plastic bands, so metal bands are being trialed). The large bands to the right are wrapped around rather than split ring bands, making it very difficult for the birds to get them off (and we glue those as well!).
We hope that mist-netting and banding will help gather data that leads to an improved scientific understanding of both resident and migratory birds in Uganda, and more effective conservation, and education programs.
CONTACT US SO WE CAN TAILOR YOUR SUMMER TRIP WITH YOU!